PostgreSQL management 
Create a backup 
When Benefits was hosted as an Application service, we downloaded a copy of the django.db SQLite file to backup the database prior to deploying new migrations. Now we generate a .json export from PostgreSQL.
The command (and all other commands in this guide) are run from the -web suffixed Container App console. It is accessible via Azure > Container App > Monitoring > Console > /bin/bash.
# writes the file to mounted storage (to ensure it survives redeployment)
python manage.py dumpdata --natural-foreign --natural-primary --indent=2 --output /calitp/app/data/db_data_YYYY_MM_DD.json
Info
--natural-foreign and --natural-primary are used to avoid serialization issues with the permission and authentication Django objects.
Copy a backup 
To manage backups, use the app container’s web-storage mounted volume.
You can view the files in the mounted volume (and upload new ones) by navigating to Azure > Storage account > Data storage > Classic file shares > web-storage > Browse.
Restore from a backup 
In order to restore from a .json backup, run the commands below from the Container App console.
# nuke existing data and rerun migrations
python manage.py ensure_db --reset

# seed data using the .json backup
python manage.py loaddata /calitp/app/data/db_data_YYYY_MM_DD.json
Monitor server health 
The Overview page for the “Azure Database for PostgreSQL flexible server” database service contains a variety of helpful charts to visualize the health of the hosted DB.
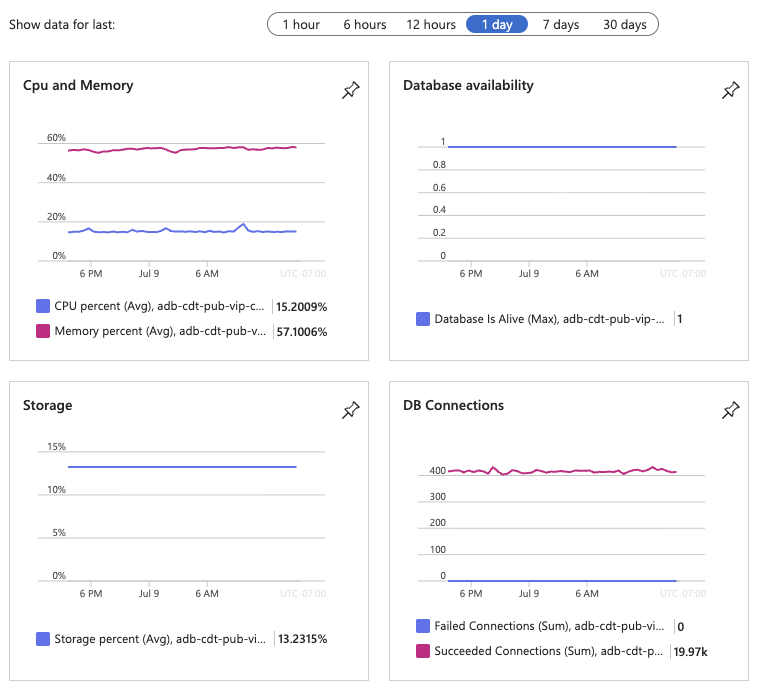
Restart the server 
The same Overview page can also be used to ↻ Restart the database service.
Provision 
Provisioning for the database service is codified via terraform. We currently use the Burstable compute tier with 32 GiB storage capacity, 1 vCore, and 2 GiB RAM. See the azurerm documentation for more information on configuring this service.
Upgrade 
When the time comes for a major version upgrade, the Overview page for the database service also offers helpful utilities for validating and upgrading the database.
Generally we expect that the steps to be:
- Perform a dry-run upgrade in azure to confirm that the db passes “Pre-upgrade validation”
- Test locally with the same version of PostgreSQL to verify appropriate behavior in the application
- Trigger the upgrade in Azure
- Update
azurerm_postgresql_flexible_serverin terraform andterraform applyto avoid reversion
Use pgAdmin 
pgAdmin provides a GUI to manage the PostgreSQL server. pgAdmin is setup slightly differently depending on the hosted environment.
Local development environment 
If this is your first time using pgAdmin or if you have recently cleared your associated Docker volume (pgadmin_data), you will need to register the PostgreSQL server:
- Navigate to http://localhost:8081 (replace 8081 with your
PGADMIN_PORTvalue if it was changed). - Select Add New Server from the dashboard or navigate to Object > Register > Server.
- Under the General tab, provide any descriptive Name for the server.
- Under the Connection tab, configure the following properties based on your environment variables:
- Host name/address: Value of
POSTGRES_HOSTNAME(usuallypostgres) - Port: Value of
POSTGRES_PORT(usually5432) - Maintenance database: Value of
POSTGRES_DB(usuallypostgres) - Username: Value of
POSTGRES_USER(usuallypostgres) - Password: Value of
POSTGRES_PASSWORD(usuallypostgres) - Save password?: Yes
- Host name/address: Value of
Note that because PGADMIN_CONFIG_SERVER_MODE=false, pgAdmin runs in desktop mode which uses an automatic default login. After setting it up, you can start using pgAdmin to manage the database, e.g. going to Servers > Name > Databases > django > Schemas > public > Tables to view the application’s tables.
Cloud environments 
To use pgAdmin in any of the cloud environments:
- Select the pgAdmin Container App resource in Azure Portal.
- Go to Networking > Ingress > IP Restrictions and add your local public IP as an allowed Source.
- Open pgAdmin by launching the Container App’s Application Url.
- On the pgAdmin landing page, use the value of the environment variable
PGADMIN_DEFAULT_EMAILfor Email Address / Username and the value of thepgadmin-admin-passwordsecret for Password.
You can then start using pgAdmin to manage the database since the Azure Database for PostgreSQL flexible server is already registered via Terraform, mostly through the configuration of the appropriate pgAdmin environment variables.